Seeing all those 2020 Range Rover Evoque announcements has probably gotten you hyped. If you are planning on becoming a proud owner of the 2020 Range Rover Evoque, you’ve probably researched this vehicle.
Unfortunately, while it provides the ultimate driving experience, it still doesn’t feature indestructible tires. As a driver, you never know when you might get a flat tire, and if you are not prepared, you can end up stuck in the middle of nowhere or be late for an important meeting.
This is why you should learn as much as you can about the vehicle you drive. Did you know that the 2020 Range Rover Evoque features an easy-to-use tire repair system? This one is a true life savior and with our help, you will learn how to effectively use it.
Let’s get straight to it. Here is how to use the tire repair system for tire maintenance on the 2020 Range Rover Evoque.
5 Things to Know Before You Repair a Tire

Your safety should always come first, this is why you need to learn a few things before you jump into the tire repair process. Make sure to memorize all the things we are about to share with you. If you don’t follow this guide, you will affect the vehicle’s safety, which may result in serious injury or even death.
Not All Tire Damage Can Be Sealed
Before you use the tire repair system, you should inspect the flat tire. If the damage is too severe, you won't be able to fully repair it. If you assess the damage to be too great, it’s always better to contact the authorized service.
What to Do If You’ve Driven the Vehicle While the Tire Was Under-Inflated
Driving the vehicle while one of the tires is under-inflated will cause additional damage to the tire. Don’t try to repair the tire damaged in this process. Contact the authorized service instead.
Pay Additional Attention to the Tire Sidewall
You should pay close attention to the tire sidewall before and during the inflation. If you spot any damage and apparent deformities on the sidewall, you shouldn’t inflate the tire.
If you can't see any of those but they appear once you start inflating the tire, you should switch off the compressor and contact the authorized service.
Respect the Speed Limit and Distance Traveled
A fixed tire is not a new tire and it comes with some limitations. First, make sure not to exceed 80 km/h (50 mph) when you are using a repaired tire. You are to replace it before you travel the distance of 200 km (124 miles).
Learn to Properly Use the Tyre Repair System
When you switch on the compressor, make sure not to stand directly beside it. Also, make sure to use it only in the temperature range of -30°C to +70°C (-22°F to 158°F).
Using the Tire Repair System on 2020 Range Rover Evoque
Park Your Car Properly
Once you have your car parked in a safe spot and away from any traffic, you should double check if the Electric Parking Break is turned on and the vehicle is in Park mode. If you have a manual transmission, the gear should be either first or reverse.
Get The Tire Repair Kit Ready
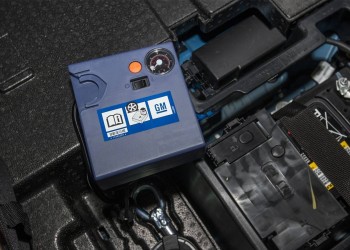
You want to start by removing the tire repair kit from your vehicle. Take the compressor out of the packaging and peel off the warning label located on the side of the compressor.
You should attach this label to your windshield on the driver’s side. Make sure not to obstruct the field of view. This will serve as a reminder of the speed limit and max distanced traveled.
You will find the inflation hose under the compressor. Uncoil it and unscrew the orange cap from the compressor unit. Take the sealant bottle (make sure not to touch the sealant if it leaks). Unscrew the cap on the bottle and screw the sealant bottle into the compressor (clockwise). Make sure that it is sitting completely tight.
Attach the Inflation Hose to the Tire
To repair the tire, you have to first remove the valve cap from it. Don’t trove the valve cap, keep it safe because you will have to screw it back on once you repair the tire.
Take the hose attached to the compressor and remove the protective cap. Now you can connect the hose to the valve on the under-inflated tire. Before you turn the compressor on, you want to double check the hose-tire connection and make sure that it is fully screwed.
Connect the Compressor
Before you connect the compressor to the power you want to make sure that is in the off (0) position. Now you can take the compressor power cable connector and insert in a 12V power socket (this is not a cigar lighter socket).
Repair the Tire
Now that everything is connected, you should start the engine and switch the on compressor (switch in the (I) position). Remember the compressor shouldn’t be turned on for more than 10 minutes. During the inflation/repair process, you want to monitor the tire pressure.
Once the sealant starts entering the tire the pressure will spike up to 6 bar (87 psi, 600 kPa). This is quite normal and it will drop back again to normal values in 30 seconds to 1 minute. Once the pressure stabilizes at approximately 1.8 bar (26 psi, 180 kPa) you should continue the repair procedure until the pressure reaches 2.2 bar (32 psi, 220 kPa). Make sure not to pass the 10-minute limit.
If it drops below 1.8 bar, stop the procedure and contacts authorized service.
Disconnect the Tire Repair System and Pack it Up
Once you complete the repair procedure you want to start by switching off the compressor. Unscrew the inflation hose and put the valve cap back on.
Put the inflation hose cap on as well and disconnect the compressor power cables from your car. Put the tire repair system back in your vehicle and take it for a 10-minute test run (max. Speed 80 km/h (50 mph)).
Once the 10 minutes pass, stop and connect the compressor’s inflation hose back to the tire valve:
- - If the pressure is higher than 2.2bar, you can continue to drive your vehicle.
- - If it is less than 1.3 bar, contact qualified assistance and don’t try to drive the vehicle.
- - If it's between 1.3 bar and 2.2 bar, repeat the inflation procedure, go on another 10-minute test run and check the pressure again. If the pressure is not at 2.2 bar, stop driving and seek qualified assistance.
If you follow this guide, you will be able to repair a tire on the 2020 Range Rover Evoque. Please note that a repaired tire should not be used for a long time. The first chance you get, take your vehicle to an authorized service to get it inspected by a professional.


0 comments